Once upon a time, there was a project where an attempt was made to use Dynamics CRM business process stages as navigation tabs. I think it happened, at first, because of some misunderstanding of what business processes are and how they are supposed to be utilized. Still, as I joined the team a few months ago, I could still see waves of that activity resonating through the project. Later on, as developers kept running into problems with this approach, it was decided to put that implementation on hold..
However, the idea of having tabs did look very attractive to the business users, and, a few months later, a new request came in.
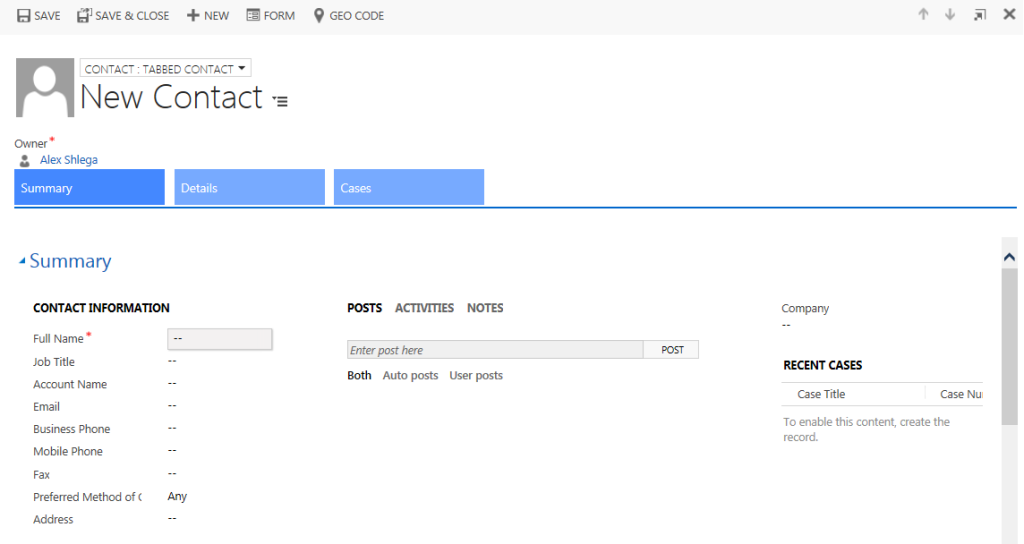
So, here is a screenshot of what I ended up with. Actually, it’s not a screenshot from the real environment – instead, I’ve created a stripped version of that solution which I deployed on the trial instance of CRM online:
The main disadvantage of this approach is that CRM form header will be rendered in the compatibility mode once an iframe is added there. Still, if this is something you’d like to try for your own implementation, I’m attaching a solution which might get you going.
Just follow these steps to start with:
- Download the solution file(this one is for CRM 2016): Tabs_1_0_0_0 and import that solution to CRM. It does not have any entities – just a couple of web resources
- Choose the entity you want to add tabs to and open a form in the form designer
- Switch to the “header”
- Add tcs_/tabsIframe.html web resource to the header (use 2 lines for height, no border, and “never” for scrolling).
- Now go back to the “Body” of the form and set labels for each of the CRM tabs on that form – see explanations below
For the labels, just use the following format:
<CRM Form Label Caption>:<Header Tab1 Caption>,<Header Tab2 Caption>…
In other words, start with the label caption. This is what you will see as a tab label on the CRM form. Then add “:”. And, after that, provide a comma-separated list of all header tabs which should be displaying that CRM form tab.
Do it for all CRM form tabs on that form. Again, you can “add” different CRM form tabs to the same header tab.
Here is an example:
Now you can save the form, publish all customizations, and test it in CRM.
The web resource you put in the form header will pick up all form & header tabs automatically based on the information you have added to the crm form tab labels, and, as you keep switching through those tabs in the header, you’ll see how corresponding CRM form tabs will be changing their visibility.
PS. It is also possible to create two javascript even handlers: one to respond to the “tab selection” and another one to provide default selection so web resource could highlight one of the header tabs when you first open the form. If you wanted to use that functionality, just add tabSelected(string) and getSelectedTab functions to the form – you can use another web resource for that. For a very simple example of those two functions, have a look at the tcs_/scripts/tabbedHeader.js web resource.


This is not working ,, I tried for custom entity
That’s unfortunate. That’s a two-years old solution, and quite a few things have changed in Dynamics since it was developed. I did not have a chance to update it (and, realistically, I don’t think it’s something that should be done unless it’s absolutely needed.. but, as a proof of concept, it served its purpose)
This is working I tried for custom entity
Has anyone had any luck implementing this code on Version 9? This exactly what my client is looking for but I can’t seem to get it to work.
It’s an old code – probably won’t be working in v9 anymore
Hello,
We have implemented this in our CRM V9 – on premise environment. We are having an issue with the rendering of the quick view forms after the form is updated. Do you have any suggestion?
To clarify, the issue we are seeing is with quick view forms which have a subgrid. Quick view forms without a subgrid render just fine.