Whether you are using a default identity provider or not, you will usually want one of these 4 things to happen to your users:
- Have them redirected to the same page where they were requested to sign in (or where they somehow initiated the sign in process)
- Have them redirected to the profile page all the time
- Have them redirected to exactly the same page all the time
- Finally, have them redirected to a page based on the specific rules
Let’s see…
Option 1: Have your users redirected to the same page where they were requested to sign in (or where they initiated the sign in process)
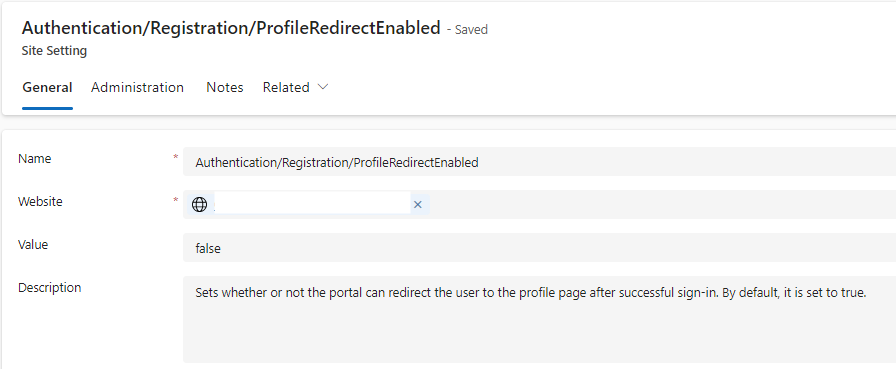
Make sure ProfileRedirectEnabled site setting is set to false:
If you have implemented your own sign in link/button, make sure to add ReturnUrl query parameter to the “SignIn” link. There is an example below, you can use it pretty much as is in your web template:
href=”/{{website.selected_language.code}}/SignIn?ReturnUrl={{page.url}}”
You don’t need to worry about ReturnUrl for those pages were access control rules have been implemented. Power Pages will be adding ReturnUrl to the redirect request automatically when asking users to authenticate if they try opening such a page while not being authenticated.
Option 2: Have your users redirected to the profile page all the time
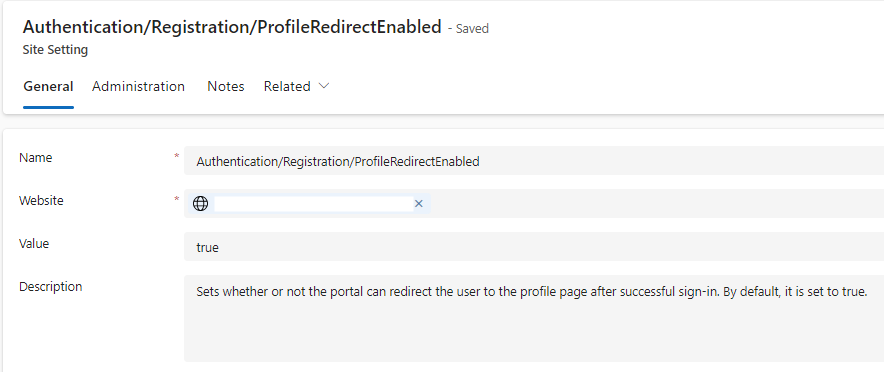
This one is simple, and it’s there by default, just make sure ProfileRedirectEnabled site setting is set to “true”:
Your users will always be redirected to the profile page once they’ve signed in.
Option 3: Have your users redirected to exactly the same page all the time
First of all, you need to turn off ProfileRedirectEnabled (see above). It has to be “false”. Otherwise, it’ll always be “Profile” page after sign in.
With that, you can try following the knowledge article here: Redirect a user to a default page on sign-in | Microsoft Learn, though I find it a bit confusing. The code below will always redirect your authenticated users to another page, so if you put it in the template that’s being used by most of your pages, your users will never be able to see those pages – instead, they’ll always be redirected, and you might also end up with a redirect loop:
{% if user %}
//if any user logs in
<script>
  window.location.href='./page/'
</script>
{% else %}
Perhaps I’m missing something; but, if the script above does not work for you (did not work for me, not the way I wanted), try the one below:
<script type="text/javascript">
  var pp_c_start = document.cookie.indexOf("pp_notauthenticated=1");
  {% if user %}
    if (pp_c_start != -1) {
      document.cookie = "pp_notauthenticated=0; expires=Thu, 01 Jan 1970 00:00:01 GMT; path=/";
      window.location.href="/Test";
    }
  {% else %}
    if (pp_c_start == -1) {
      document.cookie = "pp_notauthenticated=1; path=/";
    }
  {% endif %}
</script>
What it does is:
- It checks for the presence of a cookie
- If the user is authenticated and the cookie is set, it will unset the cookie and redirect the user to the “Test” page (You should use your own page instead 😀). Since the cookie will now be unset, the next time this script runs, it will not be redirecting the user anymore
- If, on the other hand, the user is NOT authenticated, this script will set that cookie. And, then, once the user signs in… see the bullet item above
Option 4: Have your users redirected to a page based on the specific rules
Really there is nothing fancy here, you just need to tweak the script used in Option 3 above. Use Liquid to look at the user roles / names and verify whatever else you want to verify… then decide which page you want to redirect the user to, and set that url dynamically from Liquid instead of hardcoding it in the script.